Chapter 16: Windows Operating System

Introduction to Operating System
An Operating System (OS) is a critical software layer that acts as an intermediary between computer hardware and users, managing resources and providing a user-friendly interface. It handles essential tasks like file management, memory allocation, and device control, enabling applications to run efficiently. This chapter explores the definition, functions, and conceptual view of operating systems, with a focus on Microsoft Windows, its elements, file management, disk maintenance tools, accessories, Recycle Bin, Windows Explorer, types of OS, and their significance in computing.
Definition and Functions of Operating System
An Operating System (OS) is software that manages computer hardware and provides services for applications. It serves as an interface, making hardware accessible to users through a graphical or command-line environment. Examples include Linux, Windows, VMS, OS/400, AIX, and z/OS.
Functions of an Operating System
- Memory Management: Allocates and deallocates memory for processes.
- Processor Management: Schedules CPU time for tasks.
- Device Management: Controls peripherals like printers and disk drives.
- File Management: Organizes, stores, and retrieves files.
- Security: Protects data and resources from unauthorized access.
- System Performance Control: Optimizes resource usage.
- Job Accounting: Tracks resource usage for billing or monitoring.
- Error Detection: Identifies and handles system errors.
- Software-User Coordination: Facilitates interaction between applications and users.
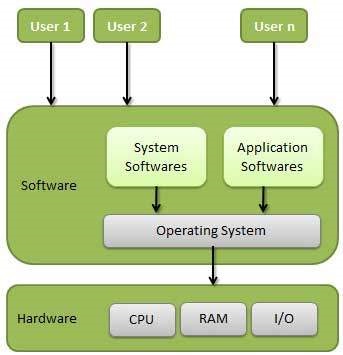
Conceptual View
|
| Conceptual View of Operating System | it2edu |
The OS sits between hardware (CPU, memory, storage) and user applications, managing resources and providing services like process scheduling, file systems, and device drivers. It abstracts hardware complexities, ensuring seamless operation.
Microsoft Windows
Microsoft Windows is a family of proprietary graphical operating systems developed by Microsoft, widely used on personal computers and servers. Introduced in 1985 as a graphical interface for MS-DOS, Windows simplified computer use with intuitive menus and buttons, replacing text-based commands.

Purpose
Windows provides a graphical user interface (GUI), supports diverse peripherals, and enables multitasking, making computing accessible and efficient for users.
Versions of Windows
| Version | Release | Key Features |
|---|---|---|
| Windows 1.0–2.0 | 1985–1992 | Point-and-click interface, icons, keyboard shortcuts |
| Windows 3.0–3.1 | 1990–1994 | Improved icons, Program Manager |
| Windows 95 | Aug 1995 | Plug-and-play, faster performance |
| Windows 98 | Jun 1998 | FAT32, USB, DVD support, Internet Explorer integration |
| Windows ME | Sep 2000 | DOS booting option |
| Windows NT 3.1–4.0 | 1993–1996 | Pre-emptive multitasking, NT Server |
| Windows 2000 | Feb 2000 | Business-oriented, application support |
| Windows XP | Oct 2001 | Enhanced UI, Home and Professional editions |
| Windows Vista | Nov 2006 | Improved security, reliability |
| Windows 7 | Oct 2009 | Faster startup, Media Center |
| Windows 8 | Aug 2012 | Touchscreen support |
| Windows 10 | Jul 2015 | Microsoft Edge, fast startup |
| Windows 11 | Oct 2021 | Modern UI, enhanced productivity |
Window Elements
A window is a rectangular unit in the Windows GUI, acting independently. There are two types: application windows (for programs) and dialog boxes (for user input).
Border
The border defines a window’s edge and allows resizing. Dragging the border with a double-headed arrow cursor adjusts the window size.
Title Bar
The title bar displays the window’s name and contains control buttons, located at the top of the window.
Control Buttons
- Control Menu: Located at the title bar’s left, it offers commands like move, resize, or close (icon varies by Windows version).
- Maximize/Restore Button: Enlarges the window to full screen or restores it to its previous size.
- Close Button: Closes the window, equivalent to “Cancel” in dialog boxes (introduced in Windows 95).
- Help Button: Adds a question mark to the cursor for contextual help (Windows 95 and later).
Menu Bar
Located below the title bar, the menu bar contains dropdown menus (e.g., File, Edit) for application commands.
Popup Menu
Activated by right-clicking, popup menus provide context-sensitive options based on the clicked item.
Status Bar
Located at the window’s bottom, the status bar displays application or system status information.
File Management
File
A file is a named collection of data stored on secondary storage (e.g., disks, tapes). It consists of bits, bytes, or records, defined by its creator and user.
File Structure
Files have specific structures (e.g., text files as lines, object files as machine-readable blocks) that the OS understands. UNIX and MS-DOS support minimal structures, while others offer more variety.
File Types
- Ordinary Files: Contain user data (text, databases, executables), supporting operations like add, modify, or delete.
- Directory Files: List file names and metadata.
- Special Files: Represent devices (e.g., disks, printers), divided into character special (stream-based) and block special (block-based).
File Access Mechanisms
- Sequential Access: Records are accessed in order, suitable for compilers.
- Direct/Random Access: Records are accessed directly via addresses, regardless of sequence.
- Indexed Sequential Access: Uses an index with pointers for direct access, built on sequential access.
Space Allocation
- Contiguous Allocation: Files occupy consecutive disk spaces, simple but prone to external fragmentation.
- Linked Allocation: Files use linked disk blocks, eliminating fragmentation but inefficient for random access.
- Indexed Allocation: Uses an index block to store file addresses, solving issues of contiguous and linked allocation.
Disk Cleanup and Defragmenter
Disk Cleanup
Disk Cleanup frees disk space by identifying and deleting unnecessary files, with user control over deletions. Access varies by Windows version (e.g., via System Tools in Windows 7, 8, 10).
Disk Defragmenter
Disk Defragmenter consolidates fragmented files for faster access, improving performance. It is accessed via Start > Accessories > System Tools > Disk Defragmenter, typically for the C: drive, and may take hours.
Windows Accessories
Paint
Microsoft Paint is a simple graphics editor for creating and editing bitmap images. It supports precise pixel positioning, image resizing, and clipboard pasting. Access via Start > Accessories > Paint (executable: pbrush.exe).
Notepad
Notepad is a lightweight text editor for plain text (.txt) files, ideal for editing system files or source code. It supports minimal formatting, clipboard text stripping, and a logging feature for .LOG files. Limitations include no Unix/Mac newline support and basic search/replace (newer versions only).
WordPad
WordPad is a text editor supporting Rich Text Format (RTF) with formatting (fonts, bold, italic) but lacks advanced features like spell check. It supports Unicode (Windows XP+), opens older Word files (with limitations), and integrates with speech recognition (Windows Vista+). Windows 7 introduced an Office-style ribbon UI.
Recycle Bin
The Recycle Bin temporarily stores deleted files, accessible via its desktop icon. Empty bins show an empty icon; filled bins show papers. Files are moved to the bin via drag-and-drop, Delete key, or right-click > Delete. Users can restore or permanently delete files, with “Empty Recycle Bin” freeing disk space. It serves a similar purpose to the Mac’s Trash, recycling disk space upon emptying.
Windows Explorer
Windows Explorer (renamed File Explorer in Windows 8+) is a graphical file management utility introduced with Windows 95, replacing File Manager. It enables users to navigate, manage, and perform actions (rename, move, copy, delete) on files and folders.
Features
- Toolbar: Includes Home (general actions), Share (email, print), and View (customize display) tabs.
- Navigation Pane: Displays a tree view of drives, libraries, and shortcuts.
- File/Folder View: Shows contents with customizable formats (icons, lists, details).
Folders
Folders, or directories, organize files, applications, or subfolders. Windows 7 allows custom folder icons created via Paint as .ico files, applied through folder properties.
Customizing Folder Icons (Windows 7)
- Open Paint (Start > Accessories > Paint).
- Import or create an image, save as .ico (e.g., “myicon.ico”).
- Right-click the folder, select Properties > Customize > Change Icon.
- Browse to the .ico file, select, and apply.
Types of Operating Systems
- Single-User, Single-Task: Runs one program at a time (e.g., MS-DOS).
- Single-User, Multi-Tasking: Runs multiple programs simultaneously (e.g., Windows, macOS).
- Multi-User: Supports multiple users concurrently (e.g., Linux, UNIX).
- Real-Time OS: Processes data instantly for critical systems (e.g., RTOS in embedded devices).
- Distributed OS: Manages networked systems as a single unit (e.g., Amoeba).
Importance of Operating Systems in Computing
The OS is the backbone of computing, bridging hardware and users. It optimizes resource allocation, enhances user interaction via GUIs, and supports diverse applications. Windows’ evolution, from text-based MS-DOS to modern Windows 11, exemplifies OS advancements in usability, security, and performance. Tools like File Explorer, Recycle Bin, and accessories streamline tasks, while file management and disk maintenance ensure system efficiency. Modern OS features, such as cloud integration and AI assistants, continue to drive innovation across devices.
Questions
Note: The provided content did not include explicit questions for this unit. The following questions are derived from the context to align with the format of previous chapters.
- What is an operating system?
- What are examples of operating systems?
- What are the main functions of an operating system?
- What is the purpose of Microsoft Windows?
- What are the major versions of Windows?
- What are the types of windows in the Windows GUI?
- What is the role of the title bar in a window?
- What are control buttons in Windows?
- What is a popup menu, and how is it accessed?
- What is a file in the context of an operating system?
- What are the types of file structures supported by an OS?
- What are the different file types in Windows?
- What are the file access mechanisms?
- How does an OS allocate disk space to files?
- What is Disk Cleanup, and how is it used?
- What is Disk Defragmenter, and why is it important?
- What is Microsoft Paint, and what are its features?
- What is Notepad, and what are its limitations?
- What is WordPad, and how does it differ from Notepad?
- What is the Recycle Bin, and how does it function?
- What is Windows Explorer, and what are its main features?
- How can you customize folder icons in Windows 7?
- What are the different types of operating systems?